

This blog is about a feature that is truly a pearl in the feature set of AHV. AHV is Nutanix’s own hypervisor based on KVM. Nutanix stripped out all unnecessary components like shared storage features and build the hypervisor from the ground up with an enterprise grade feature set.
One of the AHV features is “VM scripted install”. When you create a VM, there is the option presented in the creation wizard to add an “autounattend.xml” file. This XML file will do a fully unattended installation of for example Windows. This blog post is about how to setup the VM create wizard to do a Windows 2019 unattended installation from an ISO file in combination with the VirtIO drivers. The VirtIO drivers are necessary so that Windows understands the Nutanix Distributed Storage Fabric (DSF). You can download the VirtIO ISO file from the Nutanix portal.
Before you begin with the “Create VM” wizard, you need to upload a Windows 2019 and VirtIO ISO file to the AHV “Image Service”.
- Go to Prism and login
- Go to the settings dashboard and click “Upload Image”
Make sure you upload both images as “Image Type” ISO. When the upload is done, go to the VM dashboard in Prism.
- In the VM dashboard click on “Create VM” at the right hand topside
- Fill in the name of the VM
- Specify the amount of vCPU and memory for the VM
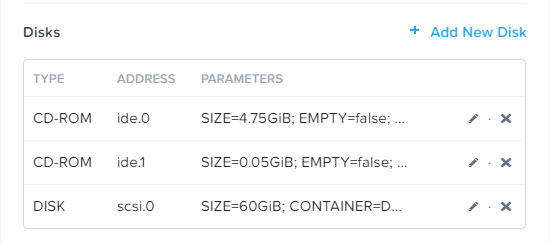
The wizard automatically adds a CD-ROM to the VM. For the unattended installation we need 2 x CD-ROMs and 1 x vdisk for the Windows installation.
- Click edit on the existing CD-ROM
- Select at “Operation” field: “Clone from Image Service”
- Select at “Image” field: the uploaded Windows ISO file
- Click “Update”
- Click “Add new disk” and select “Type” CD-ROM
- Select at “Operation” field: “Clone from Image Service”
- Select at “Image” field: the uploaded VirtIO ISO file
- Click “Add”
- Click “Add new disk” and select “Type” DISK
- Select at “Operation” field: “Allocate on Storage Container”
- Select at “Storage Container” field: “Default” container (or another container that you created)
- Specify the size of the disk in the field “Size GiB” and click “Add”
Above configuration looks as follows:

Now that we specified the Name, Resources and disks we can add a Network Interface to the VM.
- Scroll down and click “+ Add New NIC”
- Select a network from the field “Network Name”
- Click “Add”
After we added the NIC to the VM we can enable the VM Script feature.
- Select “Custom Script”
- Select option “Upload a File”
- Click “Save”
This configuration looks like this:

Attached you find an example XML file which can be uploaded with this option. It is also possible to copy the XML content and paste it in the option field: “Type Or Paste Script”.
The VM is created and can now be “Powered On” in Prism. After the VM is powered on the option “Launch Console” can be used to watch the installation process of the VM.
An unattended installation is often the first step when creating a template VM. With this custom script feature you don’t need an automation framework to setup first.
Attachment: